Placing Reference Lines
Reference Line Overview
Row Reference lines are placed using the Place Reference Tool. The pulldown provides two options - A Center Aligned reference, or an End Aligned reference.
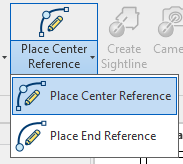
Once selected, the command works just like a standard model line, where a user may select the line / arc type desired for the row.
A note about line / arc geometry
Any non-closed line or arc may be used to place seats. A circle or a full ellipse will fail. In addition, be mindful of tight curves. The application assumes the designer has provided row references that will work with the intended seat. It will not adjust for corners or radii that are too tight for adjacent standards.
Insertion Points
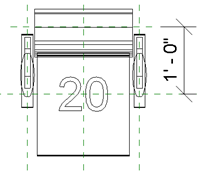
Reference lines should be placed relative to the insertion point of the seat, as this is considered the pivot location for rotating around arcs. As a result, reference lines will need to be offset from a step or slab edge to account for the necessary distance. Each seat family has a Type Parameter called PB_Plan_Datum_Offset that holds the recommended offset distance. For the Generic Fixed Seat included with the application, the distance is 1'-0".
Alternate Placement Method
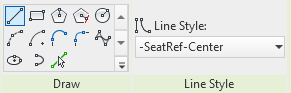
Because a Row Reference line is simply a model line with a specific linetype, a designer may decide to insert model lines through the standard Revit tool. Provided the line is a model line, and its line style matches the Center or End style name in the Settings window, this is perfectly valid. This is a typical approach when offsetting slab edges for references.